Friday, September 26, 2014

SESSION FOUR  "The Squeeze"
  The previous session included warm-ups and a gentle routine you can use with all that you've learned so far. Today we will do a couple of standing poses, and then, in Yoga Notes below, I will recommend some good books and DVDs for home yoga practice. From here on, I will occasionally demonstrate postures, but mostly I plan to give you some yoga teachings that will help you take your yoga off the mat, regardless of your level of experience, and I also want to help those with "round bodies" with some modifications just for them.

Last time I introduced you to Staff Pose as part of your yoga routine. This is a great pose for aligning the posture in preparation for any seated poses. The spine is long, shoulders back and down, legs extending out through the heels. The front of the torso is open for easy breathing, so begin by inhaling a breath, and then on an exhalation, move into your forward bending or twisting or lifting pose.
  Always work with the breath as accompaniment to movements and in holding. This helps the muscles to stretch in different positions of the body and increases flexibility, as well as opening areas of the body to the flow of "prana" or "life force"--that element that leaves you relaxed as well as energized after your yoga practice!

In the photo below I am demonstrating "Mountain Pose".  This posture gives a feeling of being grounded and steady, like a mountain, with energy flowing upward, lengthening and opening the body through the torso and arms.
For steadiness in the posture, bring up a lifting squeeze in the buttocks, and feel how this firms the legs and the belly and supports the spine. "The Squeeze" is a simple name for mula bandha, or "root lock" which is an internal lifting upward through the core of the body, from perineum to the back of the throat, ending in a soft smile. We implement the Squeeze as a protection for the lower back. When maintained, the Squeeze gives added support to the spine as it twists, and as it bends forward or backward or side to side. Make it a habit to employ The Squeeze in all your standing postures, and even in some others, as we'll do later, to create safety and more effective postures.


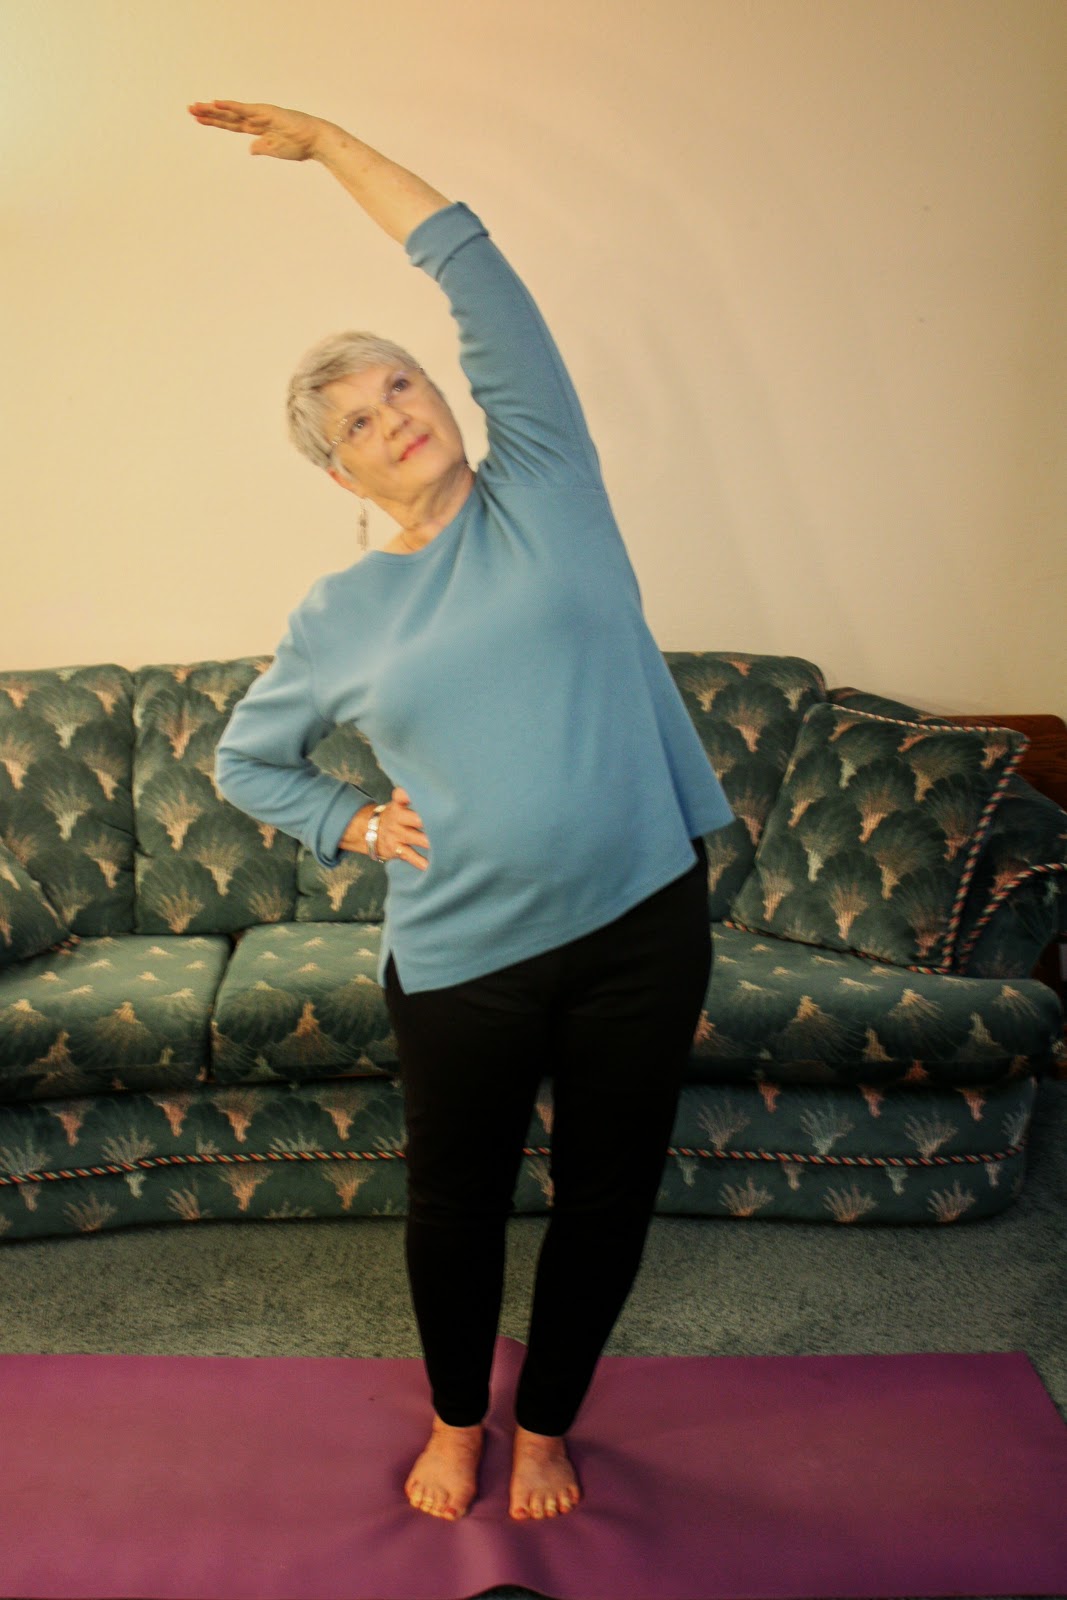
This posture is "Half Moon" demonstrated first with one hand on the hip (sometimes called "Quarter Moon") for those with a weak lower back, and again with both arms extended overhead. The Squeeze is engaged as the hips are alternately pressed out to the side, to bring the body from Mountain Pose into the arched position of Half Moon. During the hold, imagine your deep, slow breaths are moving in and out between the ribs of the extended side. Come slowly back to Mountain, and repeat to the opposite side. Be careful to stay in one plane in this pose, not drooping forward or dropping back.
This pose strengthens the ankles, legs, torso and back muscles, and opens the body for deep breathing. It is a balance of strength and flexibility, and an opportunity to notice where in our life we might be too rigid with ourselves or others; where we might stand up for ourselves more; what we actually stand for in our life; how bending a little might allow life to be a little easier for us, etc. As you become familiar with the posture, use the holding time to breathe fully and contemplate these things as they apply to you today. Add Mountain and Half Moon to your daily routine!


Yoga Notes: Now that you have learned a few basics, you can benefit from some books designed to help you practice yoga at home. For beginners, seniors, and anyone who wants a gentle practice, I recommend a book that has been around for decades and has introduced thousands of people to yoga in their own homes:
Richard Hittleman's Yoga 28-Day Exercise Plan, pub. by Workman Publishing Co. Inc., NYC.  Photos and simple text allow you to follow this easy-to-use program for 28 days and really see results!
Lilias! Yoga Gets Better With Age by Lilias Folan, pub. by Rodale Press.  Lilias Folan has been teaching yoga for decades. You may remember her as the young woman with the long braid teaching yoga on PBS TV years ago. The braid is gone, but the pleasant demeanor and yoga expertise remain! Any of Lilias' books, videos and DVDs will give you excellent, gentle, effective yoga instruction. I've taken a workshop from her, and she is delightful.
Ageless Yoga: Gentle Workouts for Health & Fitness by Juliet Pegrum, pub. by Sterling Pub. Co., Inc., New York  is a very helpful book, using props that include a chair--so helpful!--with lots of photos, and basic yoga exercises that you can do safely. Some of the photos show an instructor assisting the student, which can be very helpful for you at home, as you can then imagine the instructor assisting you in the same way.
DVDs from Kripalu Center for Yoga & Health are available for all levels, with clear instruction. I also recommend DVDs (or old videos) by Lilias Folan (Gentle yoga) and Rodney Yee (Gentle to Intermediate & Advanced).
 Beware of DVDs that do not instruct you in modifications and safety, but just expect you to follow a model with a super-flexible body, as if we should all be able to do what they do! NOT SAFE!
Next time: Yoga helps for round bodies!

Thursday, September 25, 2014

Session 3  Warm-Ups and Your First Yoga Session  (Be sure to read "Yoga Notes" at end of post!)
Now you have all your props assembled within reach, so use them as you see fit, if I don't mention it!
Today we will do a few simple warm-ups which can be repeated a second time from beginning to end, to create a gentle, beginner level yoga session.

These warm-ups loosen up the spine, shoulders, and neck, massage the abdomen, and help you breathe deeply.
Sitting on your cushions, pelvis tilted forward, back long, begin to gently turn from side to side, twisting at the hips. (Without the cushions, your twist will be less free and easy.) You may want to just swish gently back and forth in a continuous movement a few times to warm up your spine, exhaling an audible "Ha!" breath over your shoulders, and then twist to one side and hold at a point where you just begin to meet with resistance, while you breathe slowly and deeply a few breaths. Then repeat to the opposite side.


The next six photos show a series of movements called "The Six Movements of the Spine", which you begin by coming into "Table Pose" on all fours, hands directly under the shoulders, and knees directly under the hips, hip-width apart..
The first 2 photos demonstrate "The Cat Stretch" where the spine is moved up and down, first rounding the spine up and pulling the belly muscles up as well, as you exhale the breath, and tucking the chin and tailbone under... 

 
...then dropping the belly down on an inhalation, lifting the tailbone and chin up a bit. This is done in a continuous, gentle motion, or with pauses if you like in each extreme position. Repeat several times, and feel your spine flexing like a garden hose.
 

The next two movements are side-to-side, exhaling as you press ear to shoulder and shoulder to hip, then inhaling to center, and exhaling as you curve around to the other side. 
Again, the movement can be continuous, or you can hold and breathe at the extreme position.
 
The final movement is a twist, called, interestingly enough, "The Twister." Begin by lifting the right arm up to the side and taking in a breath. As you exhale, slide that arm under the left, bring your ear and shoulder to the floor (or, modify by resting your ear on a cushion) and stretch the right arm along the floor.
 
 
Finally, reach the left arm up and slowly circle it around in a counter-clockwise direction to rotate the shoulder. Inhale as the arm circles upward, opening the left side of the chest, and exhale as the arm circles downward. Repeat the shoulder rotations 4 or 5 times.

You will repeat this on the opposite side, but circling the right arm around and around in a clock-wise direction. BE SURE TO BREATHE ALONG WITH YOUR MOVEMENTS!
 
And now, you can create your First Yoga Routine by combining what you have learned so far:
Begin in Easy Pose, on your cushions, eyes closed, and crown pressing upward to elongate your spine. Relax your shoulders down your back. Smile gently. Take some full, slow breaths in and out through your nose, feeling your belly move outward as you inhale, and drawing it gently in as you exhale. Focus on your body, as you breathe, relax, feel, watch and allow. When you feel centered in your body, proceed with the following, using props as needed:
 
Seated Gentle Twists 8-10 times. Remember to "HA!" over your shoulder as you swing back and forth; then hold & breathe 5 full, slow breaths, to one side and then the other. Rest briefly.
 
Six Movements of the Spine   Remember to BREATHE with each movement. IMPORTANT!
Pause and rest briefly.
 
Seated Forward Extension   Hold the pose for 5- 8 breaths, releasing any unnecessary tension. As you exhale, notice if your torso drops you a little more deeply into the pose. Don't force it!
 
Fish Pose  If not using a bolster, hold the pose for 5 - 8 deep breaths, dropping the shoulders toward the floor to broaden and open the chest. Then rest briefly on your back. If using a bolster, hang out here as long as you like.
 
Roll to one side and come to Staff Pose. Press the hands into the floor as if lifting yourself off the floor. This pressing strengthens the arms and wrists and helps prevent osteoporosis by stimulating bone growth. Hold and release as many times as you like.
 
Repeat the sequence of postures from the beginning. Remember the breath. Relax excess tension. Feel what's happening in your body, rather than being concerned with how well or how poorly you are doing. Watch how sensations and flexibility change as you go along. Allow your body to do just as well as it can TODAY, without any judgements.
            
When you finish with the Staff Pose the second time, assume Corpse Pose and relax deeply, body, mind and spirit (remember those visualizations!) for at least 5 minutes. Then wiggle fingers and toes, roll to one side, and gently sit up. Notice how you are feeling!
 
                   THIS SIMPLE PRACTICE HAS GREAT BENEFITS ON ALL LEVELS!
 
THERE! You've had your first Home Yoga Class! Jai Baghwan! (I honor your sacred spirit!)
Next time:  Standing on our own two feet!
 
YOGA NOTES
Breath work in yoga is one of the things that sets yoga apart from other forms of exercise. Even though your movements are often slow and gentle, when deep breathing accompanies the postures, muscles are more fully expanded and stretched, the lymphatic system and  the digestive system are stimulated to help cleanse the body of toxins, and tension is more completely released. The lung capacity increases (wonderful for asthmatics) and more oxygen is taken into the blood as it passes through the lungs, increasing energy and vitality. With each deep breath the heart is given a little tug that is important to heart health.
Yoga without the breath work is simply a stretch class. You will often forget to breathe deeply during your yoga practice, we all do! It may help to make a sign reminding you to "Breathe!" to post near your mat when you practice. In fact, put some sticky notes around your home and in your car, to remind you to take some deep breaths during your day to release tension and to bring your awareness into the moment. It works! I've tried it!


Wednesday, September 24, 2014


Your last assignment was to spend the day observing yourself as you walk, sit, eat, breathe, etc. What did you learn about yourself? Notice anything you'd like to change? Did you decide to keep a Yoga Journal to record your observations on and off the mat? And were you able to assemble the recommended props?
Today we'll learn how to use the props.
Notice in the top photo, "Easy Pose" doesn't look so easy! Tight groin muscles cause the spine to round and the knees to stick up. In this position the body feels tense and uncomfortable, the back quickly becomes tired and the chest is compressed so the breath cannot enter the lungs fully.
Notice in the second photo how sitting on the edge of the cushions lifts the hips, releasing the groin muscles, so the knees drop more comfortably, and, most importantly, the spine straightens and lengthens, the shoulders can roll back and down, and the chest opens up as the front of the torso extends. Now the breath can flow easily in and out of the lungs, and the whole body is more relaxed. This is why you need those nice firm cushions! Use more than two as necessary to feel that you are truly in "Easy Pose".


Notice in the above photo how in "Seated Forward Extension" the back is rounded, the shoulders hunched, and the arms are straining for the feet. This posture is intended to extend and lengthen the spine and give a stretch to the hamstrings. But in the above version, there is way too much tension in the body for the muscles to successfully extend.

With the use of props, the hips are lifted so the back extends forward without rounding, thereby relieving any strain in the lower back. The crown of the head can press forward to enhance the stretching of the back muscles. The strap allows the arms to "grasp the feet" without strain, keeping the shoulders relaxed away from the ears, the chest open for full breathing, and the buttocks and hips can relax to help the hamstrings stretch. Gaze out over your feet toward the opposite side of the room, rather than rounding the spine to look at your legs. Breathe fully and slowly, relax all unnecessary tension, feel the areas that are opening, watch the subtle changes that happen as you hold the posture, and allow your body to accept the posture on its own level. 


This is "Fish Pose". It decompresses the lower back and digestive system, strengthens the arms, opens the chest and throat, and arches the back. The weight is supported by the arms, hands palms down under the buttocks, which press into the hands as the spine lifts and the head drops gently back. This is an excellent pose for counteracting the effects of sitting for long periods, and is good for asthmatics.

This is a lovely modification of Fish Pose, using props. Maybe your arms are still a little weak, maybe you have difficulty arching the back. Try different sized bolsters. This one is just a tad large, so there is a folded blanket behind my head so my head doesn't have to hang back so far. You can use a rolled up blanket for a bolster (which is all mine is, and I made a simple cover for it). The bolster allows you to stay comfortably in the pose longer, getting more stretch through the front of the body.
So, if you feel "like a fish out of water" in Fish Pose, try using a bolster!


Ahhhhh! Here's the pose we love! This is "Corpse Pose", done at the close of every yoga class. This is considered by some adepts to be the most difficult pose. Why? Because it isn't easy at first for most of us to really let go and relax completely. Please do not skip this pose! This 5 minutes or more at the end of your yoga practice should be taken seriously. This is the time when your body integrates all the benefits of your practice, and the more relaxed you are, the deeper the integration. This includes your mind, so substitute all those busy thoughts about the rest of your day, with visualizations of floating on an air mattress in a sunny blue lagoon, or riding a magic carpet dreamily through outer space, or lying in a grassy field of wild flowers. Smile a little. Even sigh out loud!
Some people can splatter themselves out on the floor and immediately space out in La La Land. For those of us not quite so spacey, try a bolster behind the knees to release low back tension, a rolled hand towel behind the neck (you won't believe how nice this is until you try it) and a soft folded cloth over your eyes to block out light and to help your eye muscles relax. I once had a student who couldn't still her twitchy hands during deep relaxation, so I found two smooth stones, the size of her palms, to rest in her hands. That solved her twitchy problem!

These are the basic props to have on hand. Yoga blocks are also helpful, and if you don't have a couple, that's OK, we'll improvise as we need them.
Next time: Warm-ups and some gentle postures to form your first yoga session on the mat!

Tuesday, September 23, 2014

Welcome to Sally's Yoga at Home


Open your heart, open your mind, and let yoga enrich your life!

Welcome to my living room, where I will use my years of experience to help you learn to practice yoga postures safely, no matter your body build or skill level, right in your own home. I will give you precautions, show you how to use simple props that you already have around your home, and explain how you can make yoga work for you in your daily life in fun and interesting ways.

First of all, let me say that you can do yoga safely at home. However, if you want personal help, find a gentle yoga class with an instructor who watches the students and gives hands-on assists in the postures, encourages you to modify postures to suit your body, and cautions you if you have health issues regarding blood pressure, weight, joint or spinal problems, heart problems, etc. A good teacher knows what is going on with each of her students and creates safety for each one. I'm sorry to say these teachers are sometimes hard to find. Many teachers will let you observe or join in a class without charge the first time. It helps to let a teacher know what you are looking for. Accommodating you might well make her a better teacher!

Yoga is about consciousness, so your first lesson is to become more conscious of how you are breathing throughout the day, more conscious of what you are putting in your mouth, and more conscious of how you stand and sit and walk. This is not about criticizing yourself, but just an exercise in noticing. You might even start a simple yoga journal, and write down some of the things you notice about yourself. But don't make judgments!

Another thing you can do is gather some props. Here's what I recommend: 
1)The only thing you need to buy is a "sticky mat". These are sold at WalMart, Target, and other stores, ranging in price from $10 -$20. Be sure your mat is indeed a STICKY mat, not just a padded exercise mat, but a mat that will actually keep your bare feet from slipping when you stand with your legs are wide apart. They are made of neoprene, nothing else, and are about 62" or more long when unrolled, and about 2 feet wide, and about 1/4" thick. You need this whether you work on a carpeted or hard surface. 
2) An old necktie, soft belt, or narrow cotton scarf, to use as a tie--at least the length of a man's necktie. (Available at thrift stores for very low prices.)
3) Two very firm cushions, about 12" square. They need to be firm so that when you sit on them, they actually hold your bum off the floor 2" - 4" inches. Squashy pillows are no help whatsoever, and that's probably all you'll find in the stores, so go to a thrift store where there will be a bin of older, firmer pillows, and wash them or put pillow slips on them.
4) Optional props include a blanket (various uses), a rolled hand towel to put under the back of your neck, and a soft washcloth to cover your eyes during relaxation.
Our first class will incorporate some or all of these, so be ready!